Thursday, September 16, 2010

Chilaquiles

Chilaquiles are all the rage... no seriously, they are. I first encountered these on a menu at El Rey in Philadelphia. I had never heard of them, so I asked the server, and I am glad I did. The server described them as their homemade tortilla chips tossed, until slightly soft, with salsa verde. Then, they are topped with cotija cheese and Mexican crema. THEN!... (the best part)... they are topped with 2 fried eggs. There are other variations that include topping the chilaquiles with chicken, skirt steak, etc. However, I just had to try it with the fried eggs. So amazingly good.

Since then, I have seen the Executive Chef from El Rey on a local news show, making this exact recipe [Side note: Apparently these have been voted best hangover food in Philadelphia]. And, I have also seen Marcela Valladolid make it on her Food Network Show, Mexican Made Easy.

I decided to give these a try, using Marcela's recipe. I have made other salsa verde in the past, but Marcela's version won me over. It is a little more labor intensive, but it is well worth it. Chips, salsa, and eggs sound like a strange combination, but trust me, this is delicious!

Sunday, September 5, 2010

Devil's Food Cupcakes with Swiss Meringue Buttercream

I was asked to make cupcakes for my nephew's birthday, and I was excited to come up with a fun combination. My nephew turned 10 this year - I cannot believe how old he is!

Since my nephew loves chocolate cake, I chose a Martha Stewart Cupcakes recipe for Devil's Food and decided to pair it with Swiss Meringue Buttercream. This was a delicious combination.. the devil's food was moist and slightly tangy, while the buttercream was buttery and subtly sweet.

I also made a batch of sugar cookies with royal icing to decorate the cupcakes. (I used the same recipe from the previous blog post,) Since the party was Sponge Bob-themed, I chose a yellow coloring with white writing. For the birthday boy, there was a special Sponge Bob candle!

Devil's Food Cupcakes
Ingredients:
3/4 cup unsweetened Dutch-process cocoa powder
3/4 cup hot water
3 c. all-purpose flour
1 tsp. baking soda
1 tsp. baking powder
1-1/4 tsp. coarse salt
1-1/2 c. (3 sticks) unsalted butter
2-1/4 c. sugar
4 large eggs, room temperature
1 tbsp. plus 1 tsp. pure vanilla extract
1 c. sour cream, room temperature

Directions:
1. Preheat oven to 350. Line standard muffin tins with paper liners. Whisk together cocoa and hot water until smooth. In another bowl, whisk together flour, baking soda, baking powder, and salt.

2. Melt butter with sugar in a saucepan over medium-low heat, stirring to combine. Remove from heat, and pour into a mixing bowl. With an electric mixer on medium-low speed, beat until mixture is cooled, 4 to 5 minutes (Mine took longer.. more like 10 minutes). Add eggs, one at a time, beating until each is incorporated, scraping down sides of bowl as needed. Add vanilla, then cocoa mixture, and beat until combined. Reduce speed to low. Add flour mixture in two batches, alternating with the sour cream, and beating until just combined after each.

3. Divide batter evenly among lined cups, filling each 3/4 full. Bake, rotating tins halfway through, until a cake tester in centers come out clean, about 20 minutes.

Swiss Meringue Buttercream
Ingredients:
5 large egg whites
1 c. plus 2 tbsp. sugar
1 pound (4 sticks) unsalted butter, cut into tablespoons, room temperature
1-1/2 tsp. pure vanilla extract

Directions:
1. Combine egg whites, sugar, and salt in the heatproof bowl of a stand mixer set over a pan of simmering water. Whisk constantly by hand until mixture is warm to the touch and sugar has dissolved.

2. Attach the bowl to the mixer fitted with the whisk attachment. Starting on low and gradually increasing to medium-high speed, whisk until stiff peaks form. Continue mixing until mixture is fluffy and glossy, and completely cool, about 10 minutes.

3. With mixer on medium-low speed, add the butter a few tablespoons at a time, mixing well after each addition. Once all the butter has been added, whisk in vanilla. Switch to the paddle attachment, and continue beating on low speed until all air bubbles are eliminated, about 2 minutes. Scrape down sides of bowl with a flexible spatula, and continue beating until the frosting is completely smooth.

Saturday, August 21, 2010

Lighter Chicken Enchiladas

Because I am such a maniac for Tex-Mex/ Mexican food, I am always happy to find a recipe for a lighter version. I found this recipe on Martha Stewart's website a couple months ago, and we've made it several times. In fact, this was the first time I was able to get a picture of the finished product (not the most beautiful presentation) because Jim and I generally do not want to wait around for a picture to be taken.

In addition to the listed ingredients, we added in chopped, yellow onion with the chicken. It gave it a next texture and flavor. I thought the enchilada sauce was especially delicious, but I have found that the longer it cooks, the better the flavor meld and thus, taste!

Along with the enchiladas, I made a variation on a pico de gallo, including homegrown Jersey tomatoes - look how beautifully red they are!

Lighter Chicken Enchiladas recipe

Avocado and Corn Pico de Gallo
Ingredients:
Frozen corn, defrosted
Avocado
Ripe red tomatoes
Yellow onion
Garlic
Cilantro
Lime juice
Salt and pepper

Directions:
This recipe is all about balance and what you prefer. Add all the ingredients together, except the avocado, and add more of a certain ingredient if necessary. Fold in the avocado at the end so that it stays partially in tact.

Sugar Cookies with Royal Icing

Honestly, I was a bit nervous about my first experience with royal icing. However, I did a lot of research and asked around, so when it came time to actually make and decorate with royal icing, I was a bit more comfortable. The purpose of these cookies was for the favor of a retirement party. Since my co-worker is moving to the Orlando area and is a big fan of Disney, I wanted the cookies to reflect the Disney theme. So, I chose a Mickey Mouse cookie!
I used The Way the Cookie Crumbles blog to find the perfect sugar cookie recipe. After reading Bridget's comparisons, I chose her recipe (the first one listed on the blog entry). These cookies were delicious - soft but sturdy with a delicious flavor (from the extracts and lemon zest).
All I can say is - Thank goodness for Annie's Eats step-by-step instructions on royal icing decorating. I followed these directions closely. Since I was doing Mickey cookies, I decided on doing some black and some white. I was pleased with how they came out! And, everyone RAVED about the taste and look of these cookies. Royal icing is definitely a time-consuming process, but I think it's well worth it. I can't wait to work with it againg and to perfect my techniques.

Saturday, August 7, 2010

Pull Cake/ Monkey Bread

Sweets do not get much better than pull cake/ monkey bread. I always knew this delicious, sweet, cinnamony treat as 'monkey bread;' however, when I met Jim, he always referred to it as 'pull cake.' Regardless of the name, this is an awesome treat for brunch or dessert.

Today I was lucky enough to have my nephew over for several hours. He's 9, going on 10, and is one of the best cooks/bakers that I know! Pull cake is one of his favorite things to make and of course, EAT! The following is my own adaptation with my nephew's special techniques:
Ingredients:
1 1/2 loaves of white bread dough, allowed to rise for 3-6 hours hours (I use frozen white bread dough, thawed, and then allowed to rise)
1 1/2 sticks of salted butter, melted
2 cups white sugar
approx. 4 tbsp. cinnamon

Directions:
Grease bundt pan with cooking spray. Combine sugar and cinnamon in a bowl. Cut bread dough into bite-sized pieces. Dip the dough into butter and then into the cinnamon/sugar mixture and coat evenly; place into bundt pan. Repeat until all pieces are in the pan. Pour remaining butter over the bundt pan (if desired - this makes it extra gooey). Allow dough to re-rise in bundt pan, approximately one hour.

Preheat oven to 350 degrees. Bake for approximately 25 minutes. Cover the bundt pan with foil and then allow the cake to cook for another 5 minutes.

Allow the cake to cool in the pan for 10 minutes and then flip onto a plate. Enjoy!

Monday, August 2, 2010

Tagliatelle with Smashed Peas, Sausage, and Ricotta Cheese

For my birthday, Jim gave me a cookbook (yay!) of Giada deLaurentiis' called Giada's Kitchen: New Italian Favorites. One word sums up this book: YUM! I do not know why or how I was drawn to this recipe as the first one I made from the book, but I've made it twice now. And surprisingly, Jim ate and actually LIKED the peas. This is major.

Last time I made it I used hot (turkey) Italian sausage, this time around I used sweet (turkey) Italian sausage. Both were equally delicious... I am not sure which I preferred. Both times I used fresh, hand-cut pasta. In my mind fresh pasta really makes the dish.
This recipe serves at least 4-6 people (or 2 people with tons of leftovers). I am not complaining about the leftovers :)

Ingredients:
1 pound fresh or dried tagliatelle (I used pappardelle)
2 tbsp. olive oil
2 garlic cloves, chopped
1 lb. hot Italian sausage, casings removed
1 lb. frozen peas, thawed
1 cup whole-milk ricotta cheese (I used part skim)
1 bunch of fresh basil leaves, chopped - about 3/4 cup
1/4 cup freshly grated Pecorino Romano cheese
1 tsp. salt

Directions:
Bring a large pot of salted water to a boil over high heat. Add the pasta and cook until tender but still firm to the bite, stirring occasionally, 8 to 10 minutes if dry or according to package directions if fresh. Drain the pasta, reserving 1 cup of the pasta cooking water.

Meanwhile, heat the olive oil and garlic in a large, heavy skillet over medium-high heat until the garlic is fragrant. Add the sausage and cook, using a wooden spoon to break it up into bite-sized pieces. When the sausage has browned, about 5 minutes, push it over to one side of the pan. Add the peas to the pan and, using the back of the wooden spoon, smash the peas. Turn off the heat. Add the ricotta cheese to the pan and stir to combine, then add the cooked pasta and toss to coat. Add the pasta water 1/4 cup at a time, it needed, to make the pasta moist. (Both times I made this recipe, I used the entire cup of pasta water). Add the basil, Pecorino, and salt. Toss gently to combine and serve immediately.

Carnitas with Homemade Guacamole and Salsa Verde

One of Philadelphia's best-known restaurateurs, Stephen Starr, opened a new Mexican restaurant in Philly, called El Rey. HOLY COW is this place good! It has a kitschy feel with casual Mexican food. The portions are actually tapas-sized and are encouraged to share. My 3 co-workers and I each ordered and item, and each were equally delicious. Since that night, I had been craving Mexican food, but carnitas in particular.

A' google searchin' I went... where I stumbled upon this recipe from Williams Sonoma. It was easy to put together, and it made the whole house smell delicious. We served our carnitas with flour tortillas, homemade guacamole, homemade salsa verde, and cotija cheese. Que delicioso!
I used this recipe for the salsa verde (I halved it, which still yielded a TON of salsa). This recipe calls for 'green chiles' - I used a poblano, which added a safe amount of heat. Enjoy - you will not be disappointed!

Sunday, August 1, 2010

Caldo Verde Soup

My sister and her husband honeymooned in Portugal last October. While there, they fell in love with this soup. They introduced me to it at their house one evening, and I, too, fell in love. This is going to be a go-to soup in the Winter.

This soup can be a little messy to make, but a hand blender makes it so much easier. I love my hand blender for many recipes, but it's a MUST for this one!CALDO VERDE
Source:
http://www.soupsong.com/rkale1.html
Ingredients:
1 onion, minced
1 garlic clove, minced
4 tbsp. olive oil
6 potatoes, peeled and thinly sliced
2 quarts cold water
6 oz. dry, garlicy sausage - thiny sliced (like linguica, chorizo, or pepperoni - I used chorizo)
2.5 tsp. salt
1 lb. collards, kale, or turnip greens (I used kale) - washed, trimmed, rolled up and sliced into extra fine shreds

Directions:
In a large saucepan, saute the onion and garlic in 3 tbsps. of olive oil for about 3 minutes. Add the potatoes and saute, stirring constantly for 2-3 minutes. Add water, cover, and boil gently over medium heat for 20 minutes, until the potatoes are mushy. Meanwhile, fry the sausage in a skillet over low heat for about 10 minutes, until most of the fat has drained. Drain well and reserve.

When the potatoes are soft, remove from the heat and either mash them in the pan with a masher or puree them - then add the sausage, salt, and pepper. Return to medium heat, cover, and simmer for 5 more minutes.

When ready to serve, add the shreds of greens and summer uncovered for about 5 minutes - until they are tender and the color of jade. Mix in the last tbsp. of oil, taste for seasoning, and ladle into large flat soup plates.

I'm baaaaa-aaack!

Sorry that I have been the lamest blogger in all of blog history. Well, our kitchen is officially done, and I LOVE LOVE LOVE it! Here are some final pictures of the finished product:

Didn't Jim do an amazing job with the window mouldings?! The glass tile was a pain in the butt but really worth it. We love the contrast with the stainless steel hood.

Tuesday, May 11, 2010

Countertops, and a Sink, and a Faucet.. Oh my!

I HAVE COUNTERTOPS! AND A FULLY-FUNCTIONING KITCHEN!...


We are still in the process of getting the cosmetic stuff done, but the kitchen is back to being functional! The new stainless steel hood has arrived also, but we are waiting for our tile sample for the backsplash to come in first. If we like it, then we'll start tiling ASAP.

We also have a new stove and dishwasher. The fridge will get replaced eventually... for now, I will have to deal with the stand-out white fridge!

Monday, April 12, 2010

Kitchen Renovation: A work in progress...

Chase enjoys the mountain of cardboard from the cabinet shipping boxes.
Faolan is standing in the spot where the dishwasher will be installed. In more ways than one, he has served as a dishwasher recently!
I will continue to add pictures as the progress continues... all the cabinets are now installed! And, the dishwasher and new stove just arrived on Saturday. The granite template appointment is set for this week, although it may have to be pushed back slightly. All the cabinet installation was done by Jim, my dad, and Jim's co-worker - with a few special guest appearances by my brother and a friend of ours - Matt. The help has been invaluable!


Saturday, April 10, 2010

Kitchen - Before Pics

As I previously mentioned, Jim and I are in the middle of a complete kitchen renovation. Our house was built in the '60s, and the kitchen echoed that style. It is time for a change.

Unfortunately, demolition did not turn out to be as fun as I originally thought. I thought it would be like the HGTV shows... grab a sledgehammer and go to town... fortunately, Jim is smarter than me and explained why we could not use a sledgehammer. Total bummer, but I understood that we had to save the floors and dry wall as best as possible.

Jim began ripping out the 'cabinets,' and we learned that they really were not cabinets. Instead, it looked the original owner built in cabinet-like structures secured to the wall and floors - I'm talking plywood, 2x4's, etc. Tearing out the cabinets was more about stripping out pieces of wood. What a mess! I was responsible for carrying all the wood and millions of nails out to the trash cans in the back yard... Jim did all the hard work.

Overall, we are very excited to get rid of the fake, shelving-paper-lined, broken cabinets; cracked and peeling laminate counter top; weird/gross vent about the stove; rolling/portable dishwasher; annoying double bowl sink, and outdated kitchen. Here are some before and demolition pics... more to follow:

Saturday, March 27, 2010

Chocolate and Peanut Butter Cookies

With my brother-in-law's upcoming birthday, I thought for a while about what to make him. Luckily, he is an equal opportunity sweet-eater so I knew he'd like pretty much anything. I decided on making a new cookie, one that was recommended by my friend, Natalie.
These cookies were a decent amount of work, but they were SO worth it! They are really delicious and peanut buttery. Can't beat that! These were also my final baking product before our big kitchen renovation. For the next few months, I'll be relying on the toaster oven, microwave, and outdoor grill. Wish us luck! "Before" pictures will be posted soon....
Chocolate and Peanut Butter Cookies
Ingredients:
-
1 1/2 cups all-purpose flour

- 1/2 cup unsweetened cocoa powder
- 1/2 tsp. baking soda
- 1/2 cup white sugar
- 1/2 cup packed brown sugar
- 1/2 cup butter, softened
- 1/4 cup peanut butter
- 1 tsp. vanilla extract
- 1 egg
For Filling:
- 3/4 cup confectioners' sugar
- 3/4 cup peanut butter

Directions:
1. In a small bowl, blend flour, cocoa, and baking soda. Mix well until blended.

2. In a large bowl, beat both sugars, butter, and 1/4 cup peanut butter, until light and fluffy. Add vanilla and egg, beat. Stir in flour mixture until blended. Set aside.

3. To make filling: Combine confectioners' sugar and 3/4 cup peanut butter. Blend well.

4. Roll filling into 1" balls. For each cookie, with floured hands, shape about 1 tbsp. of dough around 1 peanut butter ball, completely covering. Place 2 inches apart on an ungreased cookie sheet. Flatten with a glass dipped in sugar.

5. Bake at 375 degrees for 7-9 minutes until set and slightly cracked.

Friday, March 19, 2010

Ireland: Dinner at Gordon Ramsay's Restaurant

When I first booked our trip to Ireland, I was excited about our first Ritz-Carlton experience. I became EVEN MORE excited when I learned that Gordon Ramsay had a restaurant on the 3rd floor of the hotel.We first went into the bar area for a cocktail and were greeted and served by the most professional and helpful server staff that I have ever encountered. With our cocktails, we were served 3 (complimentary) different amuse bouche selections. Each was delicious and unusual - battered mushroom risotto cake, a phyllo dough square filled with pesto, and one that was topped with the yolk of a quail egg.

Upon arriving to our table, we were served (complimentary) mini, deconstructed versions of French Onion soup. Absolutely delicious. The dinner menu was amazing. The 4 of us each ordered something different - John Dorey; Pork chop, cheek, belly served with delicious mashed potatoes; Sea bass with roasted eggplant; and my dish - Braised Halibut with saffron risotto and crab and sesame seed croquettes. We also received sugar snap peas and green beans in a light pesto; and a creamy potatoes au gratin.

After dinner, we were served (complimentary) pre-dessert which was a parfait with pear and a light chocolate mousse. Being the dessert connossiuer that I am, I ordered dessert (I ordered dessert before I knew there was a complimentary pre-dessert). I chose a sugar-glazed gingerbread option with baked apples and gingerbread ice cream. This was a really tasty and light dessert to finish out the meal. Or so I thought. We were next served a round of (complimentary) petit fours, including mini key lime pies, super chocolately bon bons, chilled banana ice cream coated in white chocolate, and a cordial-soaked cherry surrounded by shortbread. This was an amazing experience and by far the best meal I have ever eaten.

After dinner, we were given a private tour of Chef Ramsay's kitchen. It was the biggest, cleanest, and the most efficient place I have ever seen.


Eating and drinking through Ireland

Well, we made it back to the States safe and sound! What an amazing trip. A week was not nearly long enough to see all that needs to be seen, but we saw some amazing things within the week.

I was a little nervous about Irish food. I had heard and read about horror stories, but surprisingly, it was very good overall. Here's a run down of the good and bad:

The Bad
-To our surprise, Irish "bacon and cabbage" is nothing like the American version of corned beef and cabbage. The "bacon" is more like spiral-cut ham, the potatoes are pureed, and there is a parsley sauce (similar to a white gravy) served on top. Overall, it wasn't terrible, but it was not what I was expecting.

The Good
- Guinness: tastes better in Ireland
- Malt vinegar: I used this on many dishes and really grew to like it.
- Guinness Beef Stew: Jim ordered this. It had a delicious flavor and was served with a puff pastry on top. The beef itself, however, was really fatty.
- Fish and Chips: This is served everywhere and is extremely delicious.
- Shepard's Pie: Perhaps naive, I thought I would be eating beef... turned out to be lamb, which I usually do not eat. Overall, it was delicious though.

The Great
- Jameson and Ginger Ale: In the land of Jameson, I found a way to really enjoy this delicious Irish whiskey. Some would say it should not be mixed... oh well!
- Bulmers Cider: The most delicious and refreshing alcoholic drink I've ever had. It's called Magner's in the States. This will be a summertime staple!
- Tartar sauce: Every pub/restaurant made their own.. it was so fresh and tasty.
- Baked brie: This appeared on many pub menus. Big fan.
- Tea: I already loved tea before the trip, but I loved the wide variety of options served everywhere - even at the pubs!
- Dinner at Gordon Ramsay's Restaurant: Review in a separate blog entry...

Tuesday, March 9, 2010

Sorry for the lull in posts!

Things have been crazy at home lately, and often, we forget to take pictures of our masterpieces prior to stuffing our faces. Hopefully I'll start being a better blogger in the weeks to come!

My husband and I leave for Ireland March 10th. We're staying for 7 days at the Ritz Carlton, Powerscourt. At the Ritz, there is a Gordon Ramsay restaurant, and I really hope we have the opportunity to eat there. I will be sure to post about our eating experiences in Ireland!

When we return to the US, we will also be starting our kitchen renovation! I will be sure to snap some 'before' shots so that you can see the massive changes that we will be undertaking.

See you in about a week, Blog World! Sláinte!

Sunday, February 21, 2010

Steamed Mussels

Philadelphia has some great restaurants, but some of the best places are tiny, seemingly hole-in-the-wall joints. Monk's Cafe serves amazing Belgian beer, mussels, sandwiches, etc. And while I was living in the Art Museum neighborhood of Philly, a sister restaurant opened up half a block from my apartment, called Belgian Cafe. Belgian and Monk's are the best for unique beers, mussels, and a casual atmosphere. Both of these places have provided us with tons of inspiration for cooking mussels!

Jim and I were looking for a simple weeknight dinner to watch during the Olympics so we decided on mussels. I stopped by Whole Foods on the way home from work and picked up a bag of fresh Maine mussels, asparagus, and crusty bread. This time around, we tried a new version of mussels, and they turned out to be delicious as usual.

Ingredients:
1 bag of mussels (small-sized mussels are the best)
3 strips turkey bacon
1 bottle of beer (preferably something Belgian)
3 cloves of minced garlic
1/2 onion, diced
handful of blue cheese

Directions:
Cook bacon and set aside. Clean and de-beard mussels if necessary. In a large pot, pour in beer and bring to a boil. Set steamer in bottom of pot. Add in garlic, onion, and mussels. Cover pot and steam until mussels open, about 5 minutes. Discard any that do not open. Poor mussels, onion, garlic, and liquid from pot into a serving bowl. Top with crumbled, crispy bacon and blue cheese.

Chicken Marsala

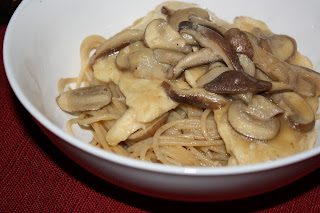
With the leftover Marsala wine from the Tiramisu cupcakes, I decided to look up Chicken Marsala recipes. I never realized how simple it was to make Chicken Marsala. I found an Emeril Lagasse recipe that turned out to be incredibly delicious. Since Jim is still learning to love mushrooms, I used mushrooms that I knew he definitely liked - baby portobellos and shiitake. We served this over whole wheat spaghetti. Try this one for sure!

Monday, February 15, 2010

Valentine's Day - Part 2

I debated for a while about what to make for Valentine's Day dessert. I thought about the obvious choice - red velvet cake/cupcakes, creme brulee, and a fancy cheese platter. I looked through my Cupcakes cookbook and decided on Tiramisu cupcakes. This was not a difficult recipe, but it did take a lot of time because of the many steps. Overall, these were very light and delicious. However, there was a salt aftertaste that I could not pinpoint. It wasn't overwhelming, but I was - and still am - perplexed.
Tiramisu Cupcakes
Ingredients:
1 1/4 c. cake flour, sifted
3/4 tsp. baking powder
1/2 tsp. coarse salt
1/4 c. milk
1 vanilla bean, cut length-wise, seeds scraped and reserved
4 tbsp. unsalted butter, room temperature, cut into pieces
3 large whole eggs plus 3 egg yolks, room temperature
1 c. sugar
Coffee-Marsala syrup (recipe follows)
Mascarpone Frosting (recipe follows)
Unsweetened cocoa powder, for dusting

Directions:
1. Preheat oven to 325. Line standard muffin tins with paper liners. Sift together cake flour, baking powder, and salt. Heat milk and vanilla bean pod and seeds in a small saucepan over medium heat just until bubbles appear around the edge. Remove from heat. Whisk in butter until minutes, and let stand about 15 minutes. Strain milk mixture through a fine sieve into a bowl, and discard vanilla bean pod.

2. With an electric mixer on medium speed, whisk together whole eggs, yolks, and sugar. Set mixing bowl over a pan of simmering water, and whisk by hand until sugar is dissolved and mixture is warm, about 6 minutes. Remove bowl from heat. With an electric mixer on high speed, whisk until mixture is fluffy, pale, and yellow, and thick enough to hold a ribbon on the surface for several seconds when whisk is lifted.

3. Gently but thoroughly fold flour mixture into the egg mixture in three batches; stir 1/2 c. batter into the strained milk mixture to thicken, then fold milk mixture into the remaining batter until just combined.

4. Divide batter evenly among lined cups, about three-quarters full. Bake until centers are completely set and edges are slightly golden brown, about 20 minutes. Allow to cool completely.

5. Brush tops of cupcakes evenly with coffee-marsala syrup (recipe below) and allow cupcakes to absorb liquid, about 30 minutes. Dollop frosting (recipe below) onto cupcakes, and generously dust with cocoa powder just before serving.

Coffee-Marsala Syrup
Ingredients:
1/3 c. plus 1 tbsp. freshly brewed very strong coffee (or espresso)
1 oz. marsala
1/4 c. sugar
Stir together coffee, marsala, and sugar until sugar is dissolved. Allow to cool.

Mascarpone Frosting (this is extremely delicious!)
Ingredients:
1 c. heavy cream
8 oz. mascarpone cheese, room temperature
1/2 c. confectioners' sugar, sifted
With an electric mixer on medium, speed, whisk heavy cream until stiff peaks form. In another bowl, whisk together mascarpone and confectioners' sugar until smooth. Gently fold whipped cream unto mascarpone mixture until completely incorporated. Use immediately.

Valentine's Day - Part 1

Although Valentine's Day is a highly commercialized holiday, my husband and I like to use it as an excuse to eat something super delicious. We decided to stay in and go with a surf and turf theme.

Jim found a steak recipe that he wanted to try while watching Discovery Health: A LYON in the Kitchen. Jim did an amazing job cooking this steak, and as he so proudly explained to me, he even achieved "sexy grill marks." We will definitely be making this recipe again!

On the surf side, I wanted to make a crab cake recipe that I had been eyeing up for as long as I owned the cookbook, Ted Allen's The Food You Want to Eat.

Crispy oven-fried crab cakes
Ingredients: (I halved this recipe)
1 lb. jumbo lump crab meat
1/4 c. mayonnaise
1 large egg, beaten
1 tablespoon Dijon mustard
2 small scallions coarsely chopped (about 2 tbsps.)
2 heaping tbsps. chopped flat-leaf parsley
1/4 tsp. Old Bay or Paprika
1/4 tsp. kosher salt
1/4 tsp. black pepper
1/4 tsp. Tabasco
1/4 c. coarsely processed fresh bread crumbs (dense, country-style loaf preferably)
3 c. cornflakes
Directions:
In a large bowl, combine the crab meat, mayonnaise, egg, mustard, scallions, parsley, Old Bay or paprika, salt, pepper, and Tabasco. Stir gently with a fork to combine. Gently stir in the bread crumbs. Cover and refrigerate for at least 30 minutes, or up to 4 hours.

Preheat oven to 400 degrees.

Process the cornflakes to coarse crumbs in a food processor and dump onto a plate. Form about 1/3 c. of the chilled crab mixture into a 3-inch cake. Gently dredge the cake in the cornflakes, turning over and completely covering the crab cakes. Continue forming the rest of the crab cakes and place onto an ungreased cookie sheet. Bake for about 15 minutes.

The whole dinner was remarkably easy and extremely delicious! We will be making both of these recipes again. Happy Valentine's Day!

Comfort Food!

With the massive amount of snow we received AGAIN, I decided to make a pot of homemade spaghetti gravy and meatballs. (And yes, it's called "gravy" in my family - if it's made with meat, then it's a gravy!) This is an old family recipe that has been passed down the generations, so I'm going to continue to keep it an in-family recipe. However, I will tell you the ingredients of the meatballs, which in my biased opinion, are the BEST anywhere! (My husband agrees.)

My meatballs contain ground beef, a couple beaten eggs, white bread, salt, pepper, parsley, and garlic. The key to these meatballs is browning the outsides and then allowing them to fully cook in the simmering pot of spaghetti gravy. My biggest pet peeve with most restaurants' meatballs is that they are not up to par. I don't know how to explain it, but they are always.... what's the word?... I guess SLIMY is the only word I can use to describe them. Yuck, no thanks!

With the start of the Olympics, my husband and I decided to have a comfort food-style TV dinner: meatball sandwiches on crusty bread (from Liscio's Bakery), topped with mozzarella and a sprinkling of locatelli cheese. Yum!

What do you view as comfort food?

Thursday, February 11, 2010

Buffalo Chicken Sausage Pizza

I am normally not a huge fan of buffalo flavorings. I do not like buffalo wings (gasp!) or anything smothered in that sauce. I prefer to eat the celery and blue cheese dressing that sits on the side of the plate. However, at the grocery store, I noticed they had a chicken sausage with buffalo flavoring. I decided to break from the mold and try it. I knew my husband would be happy since he LOVES wings.

I did not have a recipe in mind, so I just threw together a few ingredients that I thought would compliment the buffalo flavor.
Ingredients:
Pizza crust (I cheated and used a store-bought whole wheat crust)
Buffalo chicken sausage, 1 1/2 links, casings removed, crumbled
6 oz. Mozzarella cheese (depends on the size of your crust)
1 handful Crumbly blue cheese
1-2 tbsp. Frank's Red Hot Sauce
1/4 c. diced onion

Directions:
Preheat oven to 450 degrees. Brush pizza crust with olive oil and sprinkle garlic powder. Bake for 2-3 minutes (this helped us achieve an extra crispy crust.) Toss chicken sausage with the hot sauce. Remove crust from oven and layer toppings: mozzarella, chicken sausage, blue cheese, more mozzarella, and lastly onion. Allow to cook to your liking. We like crispy pizza so ours cooked for about 12 minutes on the oven rack directly - the cheese was bubbling and the onions had browned.

This was an easy weeknight meal with a perfect balance of heat, salt, and creamy-ness. Enjoy!

Sunday, February 7, 2010

Snow Day Snickerdoodles

The South NJ/ Philly area has gotten a lot of snow recently, and my husband and I have become pros at hunkering down and enjoying the weather, despite the road conditions. Yesterday's snowfall totalled just around 17" for us, so we prepared the day before with the essentials - ingredients for guacamole, wine, whiskey, and something to bake - Snickerdoodles! These have turned into my FAVORITE cookie, and although I misplaced my favorite recipe (my friend, Ellie's recipe), I did find one that is very comparable.

In addition to my husband's help, I always have a steady sous chef in the kitchen. Meet Faolan (means 'wolf' in old Gaelic) enjoying the snow!

With family close by, snow days have turned into family gatherings. My mother- and father-in-law hosted this time around, and we served white chicken chili, beef stew, and many other wonderful things. I brought the Snickerdoodles!

Snickerdoodles
Ingredients:
1/2 c. butter, softened
1 c. sugar
1/4 tsp. baking soda
1/4 tsp. cream of tartar
1 large egg
1/2 tsp. vanilla
1.5 c. all purpose flour
4 tbsp. sugar
1.5 tsp. cinnamon

Directions:
In a mixing bowl, beat the butter on medium speed for 30 seconds. Add the 1 c. sugar, baking soda, and cream or tartar. Beat until combined, scraping sides of bowl occasionally. Beat in the egg and vanilla until well blended. Beat in as much flour you can with the mixer, and stir in remaining. Cover with plastic wrap, and chill for 1 hour.

Preheat oven to 375. Combine the 4 tbsp. sugar and 1.5 tsp. cinnamon. Shape the dough into 1 inch balls and roll in cinnamon sugar mixture to coat. Place balls of dough 2 inches apart on ungreased cookie sheet. Bake for 10-11 minutes or until edges are golden. Transfer to a wire rack to cool.

Friday, January 22, 2010

The Great Vanilla Bean

On my days off from work, I love to watch Food Network. Today I was watching 'Barefoot Contessa,' and she was making a dessert with vanilla sugar. I knew vanilla sugar existed, but I never realized how easy it was to "make." After doing some more internet research about vanilla beans, I realized that making homemade vanilla extract was an easy process as well.

I instantly became fascinated with making my own vanilla sugar and vanilla extract. Luckily, I knew the perfect place to get the fresh vanilla beans. I often complain to my husband about how we live in the middle of nowhere - the closest decent grocery store is at least 20 minutes away. However, one of many good things about living in New Jersey is the easy accessibility to fresh produce and groceries from farm markets. Our local farm market is open year round and always carries fresh vanilla beans. Score!
I can't wait to try out my vanilla sugar in 2 weeks and the vanilla extract in 8 weeks!

Thursday, January 21, 2010

Lemon Thyme Chicken

I must admit, chicken is not my favorite protein, but this recipe has made me LOVE chicken. This has also become one of Jim's favorites -- this from the guy who swore he never likes "lemon chicken." This recipe has the perfect balance of lemon, garlic, wine, and thyme. And hey - it doesn't hurt that there is wine in the recipe... leftovers for enjoying WITH dinner.

I obtained this recipe from the 'What's Cooking?' board on the Nest's website. What a great resource for recipes and inspiration! This is a simple recipe that has fresh and robust flavors. This recipe can be served with an array of sides --this time around, we chose whole wheat plain cous cous and a spinach salad.
Lemon Thyme Chicken
Ingredients:
2 boneless, skinless chicken breasts
salt and pepper
3/4 cup flour
1 tbsp. olive oil
2 cloves of garlic, finely minced
2 tsp. fresh thyme leaves, chopped
2/3 cup dry white wine
Juice of 1/2 of a large lemon
2-3 tbsp. butter

Directions:
Butterfly the chicken breasts to create four halves. Season both sides of the chicken pieces with salt and pepper. Place the flour in a shallow bowl, and dredge the chicken pieces in the flour, shaking off the excess. In a large skillet, heat the olive oil over medium-high heat. Add the chicken pieces to the pan and saute until lightly golden, about 2 minutes. Flip and cook on the other side, about 2 minutes. Add the garlic and thyme leaves to the pan and saute just until fragrant, about 1 minute. Off the heat, add the wine to the pan. Return the pan to the hear and bring the liquid to a simmer. Reduce until sauce has thickened and the chicken breast has become golden brown on each side. Add the lemon juice to the pan and stir in butter until completely melted. Serve immediately, and spoon the extra sauce over the chicken.

Simple Spinach Salad
Combine baby spinach, salt, pepper, feta cheese, olive oil, balsamic vinegar, and walnuts to your liking. This is a simple, but delicious side salad!

Wednesday, January 20, 2010

Orecchiette with sausage and spinach

One of our favorite meals is one of the easiest meals ever. A few years ago, I was visiting my friend Trish in DC. She had me over for dinner and made a declicious pasta with broccoli rabe, sausage, and orechiette (Italian translation: small ear-shaped pasta). After getting back to NJ, I looked up the recipe and attempted to duplicate it: Giada's Orecchiette with Sausage and Broccoli Rabe dish. It turned out great, but Jim wasn't a big fan of the broccoli rabe.

The next time we made the dish, we used spinach instead of the broccoli rabe, and it was a hit! We've made variations of this recipe with chorizo and both sweet and spicy sausage.

Last night, Jim was in charge of dinner, and he jumped at the opporunity to make this. It's become one of his faovites! I recommend giving this one a try. It's a light pasta... no sauce or heavy taste. Everything tastes simple and fresh.

Jim and Erin's Orecchiette with sausage and spinach (makes 2 generous portions)
Ingredients:
Orecchiette pasta
Turkey sausage, 3 links, casings removed (we used sweet Italian sausage this time)
2 cloves chopped garlic
olive oil
3/4 bag of baby spinach
Locatelli cheese (optional)

Directions:
Cook orecchiette according to package while preparing other ingredients. Sautee garlic in about 4 tbsps. of olive oil for a couple minutes. Add sausage, breaking up into smaller pieces until fully cooked. Add in spinach until completely wilted. After draining pasta, add sausage and spinach mixture on top and add cheese to taste.
(Note: in our house, we NEVER use parmesean cheese. I know some people love it, but I've always been turned off by the oversized green KRAFT container. We are tride and true locatelli fans. If you haven't tried it, you must!)